Fall 2026 Edition

Fall field season is winding down, and forestry teams are shifting their focus back to the office-bringing field information together, reviewing completed work, and preparing this year's data for winter reporting.

In this edition, we're highlighting practical ways to organize field data, review spatial information, and identify missing details while the season's work is still fresh.

In this issue:

  • Bringing Field Data Back into the Office

  • Workflow Tip: Use Survey Data to Update Forest Cover and Milestones

  • Did You Know? Sync ArcGIS Online with Phoenix Connect

  • Tip of the Season: Check Your Spatial Data

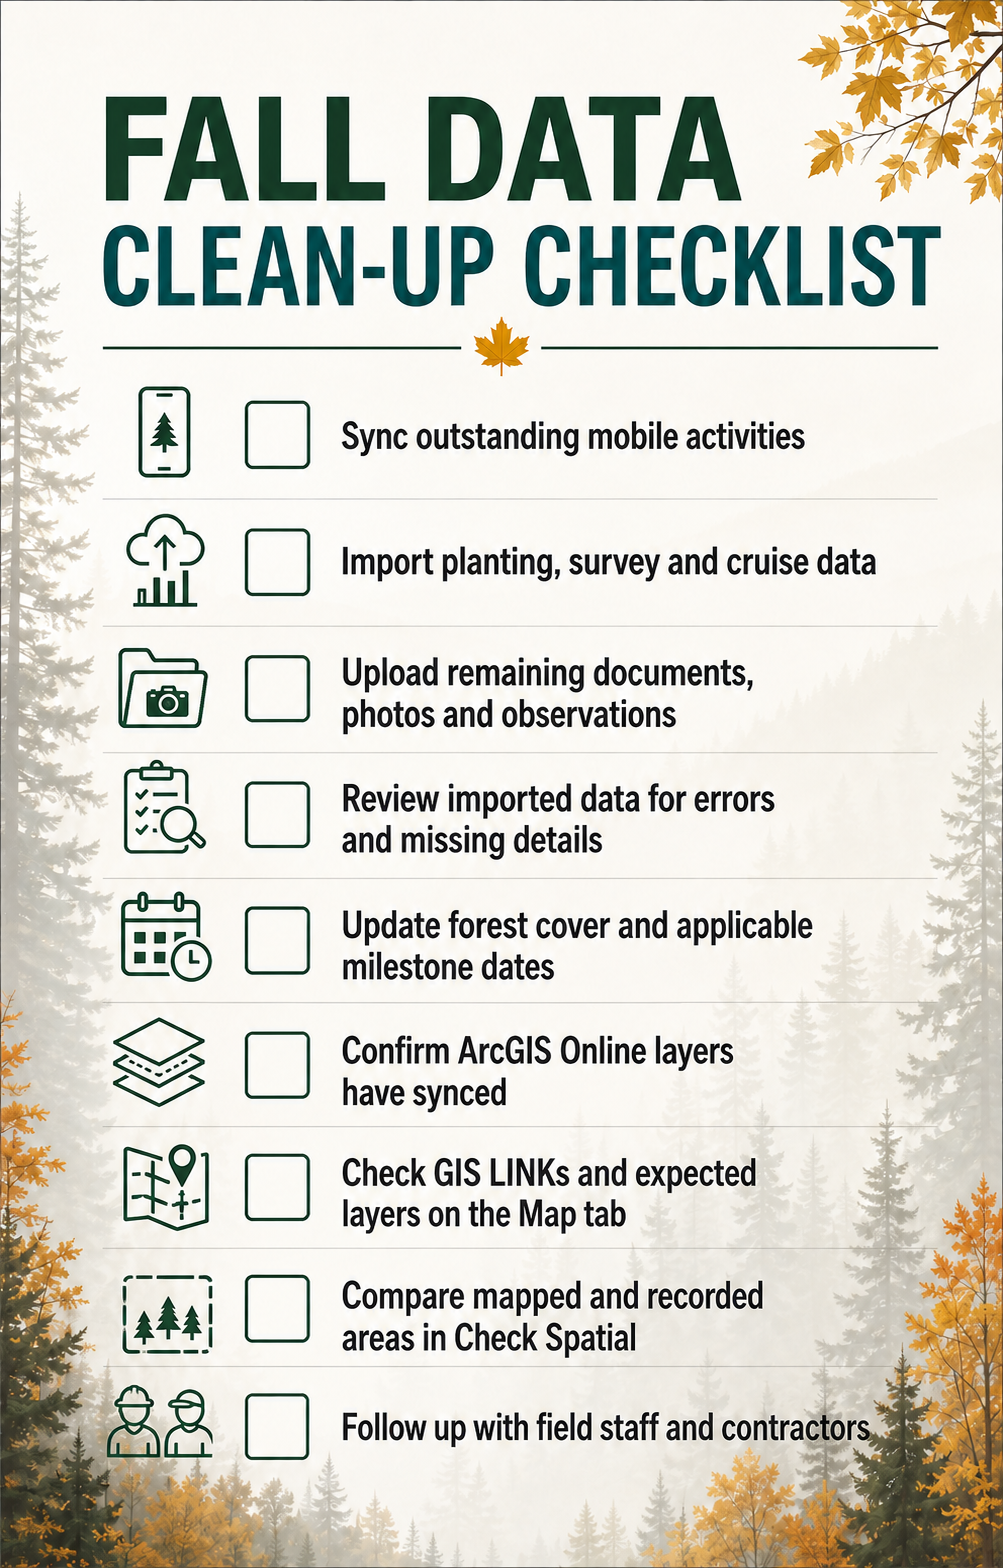
  • Fall Data Cleanup Checklist

  • Upcoming Events

Seasonal Feature: Bringing Field Data Back into Office

As field season winds down, Phoenix Connect helps bring survey, planting, cruising, inspection, and other field information into one connected system, without requiring teams to manually re-enter every record.

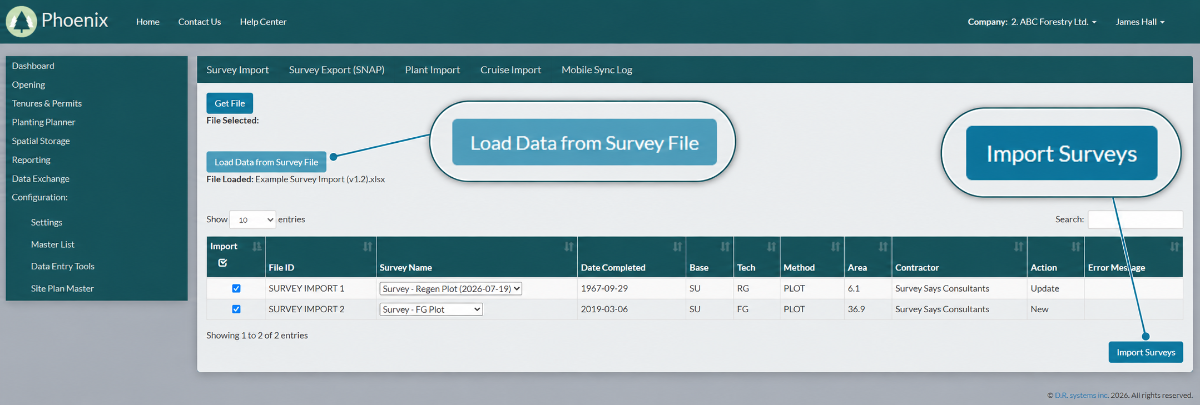
Import Survey, Planting and Cruise Data

Data collected in third-party applications can be imported into Phoenix Connect, including:

  • Survey data from SNAP!
  • Planting data from Plant Wizard
  • Cruise data from CruiseComp or CruiseMate

Phoenix Connect also provides Excel import templates for planting, survey, and cruise data. These can be completed by contractors or other team members, providing a flexible way to batch-import information regardless of which field collection system they use.

From the Data Exchange menu, simply select the completed file and match the information to the appropriate opening and activity. Phoenix Connect checks the file for errors before importing the data into the corresponding activity record. Once imported, survey activities can also be used to update forest cover information.

This reduces repetitive manual entry, helps prevent transcription errors, and keeps field results connected to the correct operational records.
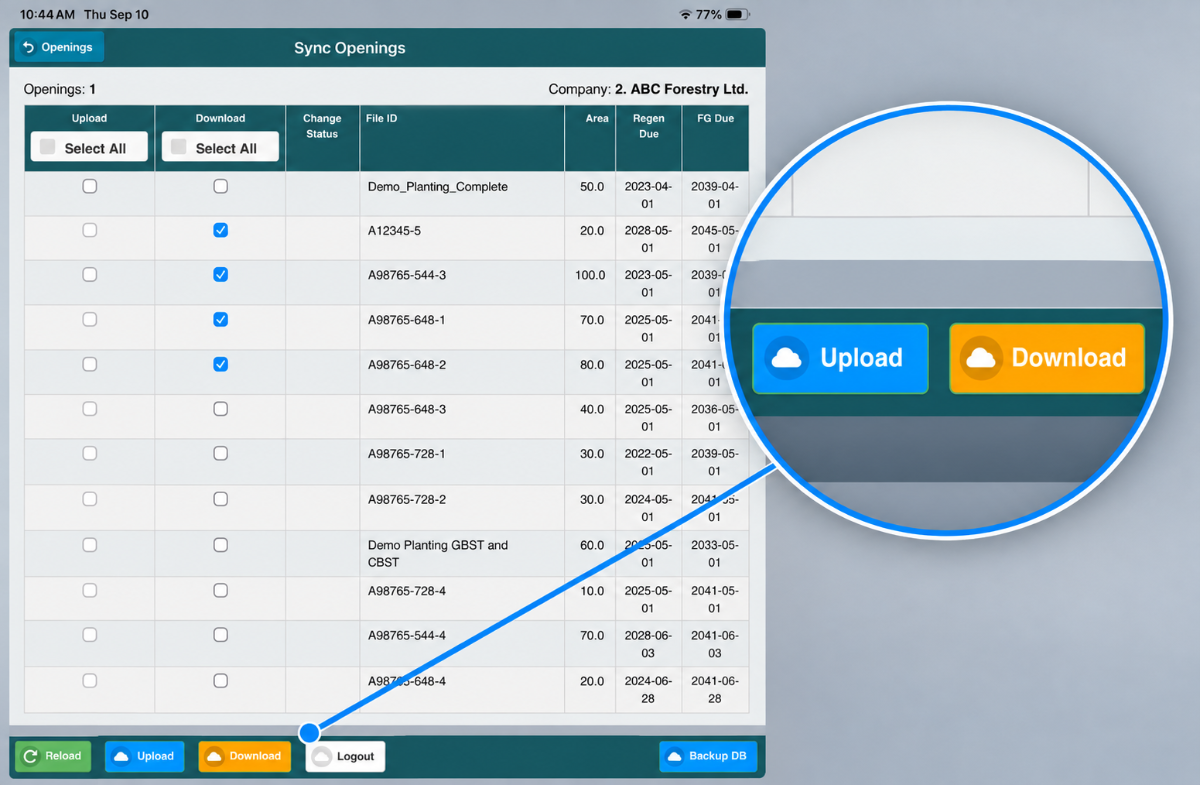
Sync Data from Phoenix Connect Mobile

For teams using Phoenix Connect Mobile, remember to sync completed fieldwork and review the information once it reaches the office. Depending on your organization's configured workflows, this may include:

  • Road and bridge inspection forms
  • Post-harvest inspection forms
  • Fire hazard assessment forms
  • Activity updates
  • Road issues and maintenance requirements
  • Field photos and observations

Reviewing synced records while the work is still fresh makes it easier to identify missing details, follow up with field staff, and ensure this season's information is complete and ready for the next stage of your workflow.
Workflow Tip: Use Survey Data to Update Forest Cover and Milestones

Once survey data has been entered or imported into Phoenix Connect, the compiled results can be used to update forest cover records and applicable milestone dates-helping carry field information forward without entering it again.

On the Survey Activity - Unit Details page, the Update Forest Cover and SU Milestones button becomes available when a Stratum has been entered for the Survey Unit. Selecting it will create or update the corresponding Forest Cover Stratum using the compiled survey details.

The same workflow can also populate milestone dates when the required conditions are met:

  • For a REGEN survey, the Survey Completed date can populate the Standard Unit Regen Met date.
  • For an FG survey, the Survey Completed date can populate the Standard Unit FG Met date.
  • When every Standard Unit has met the applicable milestone, Phoenix Connect can populate the Opening milestone using the latest Standard Unit date.

Milestone dates are only populated when the Survey Unit and Standard Unit areas match and the applicable milestone field is empty. This helps protect existing information while reducing duplicate entry and keeping survey, forest cover, Standard Unit, and Opening records aligned.

Watch the video: Update Forest Cover and Standard Unit/Opening Milestone Dates

Did You Know? Sync ArcGIS Online with Phoenix Connect

Phoenix Connect can be connected to your organization's ArcGIS Online environment, allowing selected spatial features to sync directly into Phoenix Connect.

With ArcGIS Online Spatial Sync, teams can manage spatial data within their existing GIS environment while making updated features available alongside the related operational records in Phoenix Connect. Active layers can be managed through the Sync Spatial tab, and synced features can be confirmed through the Map or Check Spatial tools.

Initial setup is completed with support from the Phoenix Connect team and can be configured around the layers and information your organization wants to connect.

If your team uses ArcGIS Online and would like to learn more about connecting it with Phoenix Connect, get in touch with us to discuss your current spatial workflow.

Tip of the Season: Check Your Spatial Data

Whether your spatial data is loaded directly into Spatial Storage or brought in through ArcGIS Online Spatial Sync, take time to confirm that each record is connected to the correct spatial feature and that the mapped and recorded areas align.

Start with the Map Tab

Open the Map tab for the relevant opening, activity, road, or other record and turn on all the layers you expect to be connected.

The spatial indicators can help identify potential issues:

  • A layer will appear greyed out when there is no matching spatial feature connected through the GIS LINK.
  • A layer will appear red when the spatial area does not match the area recorded in Phoenix Connect.

Comparing the map with the tabular record can help you quickly spot missing connections, area differences, or spatial that appears doubled or otherwise incorrect.

Investigate Issues with Check Spatial

If something does not look right, open Spatial Storage and select Check Spatial. Search for the GIS LINK to see:

  • Where the GIS LINK is being used
  • Which spatial layer it is connected to
  • The area or length of each connected feature
  • Whether the same GIS LINK may be connected more than once

This provides a useful starting point for understanding the issue before reviewing or editing the original spatial or tabular data.

If your organization uses ArcGIS Online Spatial Sync, you can also review the Sync Spatial tab to confirm that the expected layer is active and syncing has not been paused.

Recommended Spatial Review Process

  1. Confirm that the required spatial layers have been loaded into Spatial Storage or successfully synced from ArcGIS Online.

  1. If using Spatial Sync, check the Sync Spatial tab to confirm the expected layers are active.

  1. Check that GIS LINK values are complete and match between the spatial and tabular information.

  1. Open the Map tab and turn on every layer that should be connected.

  1. Look for greyed-out layers, red area warnings, duplicate-looking spatial, or other unexpected results.

  1. If you find an issue, use Spatial Storage → Check Spatial to review all connections associated with the GIS LINK.

  1. Update the source spatial data or the tabular information as required, then return to the Map tab to confirm the issue has been resolved.

Taking the time to review these connections now can help identify missing, duplicated, or mismatched information before it creates problems later in the reporting process.

Upcoming Events

You can connect with the Phoenix Connect team at these upcoming events:

  • Indigenous Forestry Conference - September 22-24 - Prince George, BC

  • Alberta Forest Products Association AGM & Conference - September 23-25 - Jasper, AB

  • Canadian Institute of Forestry - September 27-29 - Edmonton, AB

  • Woodlot BC Conference - October 2-4 - Parksville, BC

  • SAF National Convention - October 6-9 - Tacoma, WA

Have a workflow you'd like to improve?
The Phoenix Connect team is always looking for ways to support real forestry workflows. Reach out with questions, ideas, or training requests.

Thank you for reading the Phoenix Connect Newsletter.

Ainfo@drsystemsinc.com     x250-591-4433     DR Systems Inc. Forestry Operations Management Software

* )

Unite Interactive